This was the title of my 6th grade science project. It was about hatching chicken eggs, something I’ve always been fascinated with. I’ve picked this hobby back up the past few years, and have gained a lot of knowledge and experience along the way. Currently I hatch about 200 chicks per year, as well as a dozen or two heritage turkey poults, and a myriad of ducklings and goslings.
Hours old Light Brahma chicks.
I will be finishing up a hatch by Wednesday, and have ordered more eggs to set Friday. I decided now would be a great opportunity to introduce you to the ins and outs of hatching your own poultry, a valuable skill for any homesteader, poultry enthusiast, or home educator.
I will try to be as detailed as possible. We’ll begin with the topics of preparing your incubator, selecting your eggs, and proper egg handling/storage.
Incubator Preparation
If you’re lucky, you have a willing, waiting hen (or other fowl mother) to slide your eggs under.

Mama hen and her foster babes
If not, you’re going to need an incubator. I know styrofoam incubators are cheap. This is one of those instances where you get what you pay for. I tried the styrofoam. They are difficult to clean, for starters. And cleaning between hatches is crucial to subsequent hatching success, due to bacteria. Additionally, the styrofoam bator off the shelf doesn’t come with the necessary fan to circulate heat, and it doesn’t come with the super handy egg turner. These components turn a $40 incubator into a $120 incubator. Not so cheap now… and not very reusable even if you make the additional investments. I personally use and highly recommend Brinsea incubators.
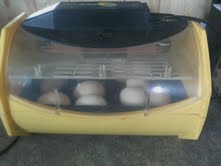
Eggs in Brinsea on lockdown
For about $200, I got this Brinsea eco. It hatches 24 eggs at a time (they offer larger and smaller incubators). It is very easy to clean between hatches. No, they aren’t paying me!! I just love this thing. I know it is pricey, but I have more than made my money back on it through selling chicks, and custom hatching jobs.
So, preparing the incubator, regardless of what you use. I will give instructions mostly for a circulated air type incubator, but if you have questions about still air, ask. I have used them extensively although I don’t like them.
A couple days before you plan to start, or set, your eggs, you need to turn it on and get it warmed up. Getting the temp just right can take a little time. It needs to be as close as possible to 99.5 degrees. I never like to see it at 99 or 100. Try to keep it right in the middle.
Once the temp is set and steady for several hours, go ahead and add some water to it. You can use a hygrometer to measure the humidity. I did until I was quite familiar with the process. Now I just add water as needed based on the ambient temperature and the relative humidity. I do not like excessive humidity. Go a little dry, it won’t hurt things, and may keep them from drowning in their shells.
Okay, this one is getting a little long, I will make a separate entry for egg selection, as that is a whole nother can of worms…please don’t hesitate to ask any questions about incubators!